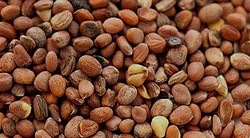
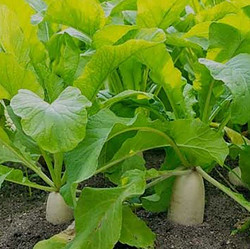
 Daikon is a type of radish eatable microgreens can be gotten from. Daikon can be nurtured like other root vegetables in a garden bed outside your house or in a container inside your house. In this post, you will learn how to grow Daikon.
Daikon seedling needs plenty of water, adequate sunlight, and protection from pests. Daikon can be eaten raw or cooked; they can even be added to your meals to make them healthier.
Part 1
Planting the Seeds
1. Plant Daikon seeds late in the summer or fall.
The time you plant your Daikon should depend on the climate of the place you reside in. For instance, if you reside in a climate where the weather starts to become cold in December, it is advisable you start planting your daikon seedling in October.
- Monitoring the temperature of the soil can assist you in determining when to plant. The temperature of the soil should be 16 to 29 degrees Celsius
- A thermometer will have to be put 15 cm into the soil to check the temperature of the soil.
2. Pick a spot with loosely-packed soil.
Any soil that is loosely-packed is best for the daikon plant, whether it is kept in a container or not. The bottom part of the soil should be well loosened to allow the daikon to grow well. Please make sure you have about 12 inches of loose-packed soil where you want to grow your daikon.
- Use a garden fork to loosen the soil if it is too tight
- Don’t pack the soil down when you intend to plant the daikon in a pot or container.
3. Ensure the radishes get a minimum of 8 hours of sunlight a day.
Select any location in your garden where you are sure sunlight can get to. If you want to plant the daikon indoors, then plant it in a container and make sure the container is placed near a window that is facing south.
- To detect the sunny parts of your garden, go outside periodically to find out the direction from which the sun is shining. 8 am, 12 pm, and 4 pm should be the ideal time to check the direction of the sunlight.
4. Design rows that are 20 to 30 cm away from each other.
To assist your daikon radishes to grow well, ensure that they are spaced about 20 to 30 cm apart from each other. You can choose to grow the radish in the entire row, or you can mix it with another plant.
- You can only plant one row of daikon if you’re planting it in a container or a big pot.
5. Daikon seeds should be planted 2 to 3 inches away from each other and 0.5 inches deep.
Daikon seeds don’t need to be thrown deep into the soil for them to grow. You can just dig a hollow hole or some holes in your row container. Ensure that the holes are spaced at about 2 to 3 inches away from each other.
Part 2
Taking Care of the Seedlings
1. The seedlings should be thinned out when they start to grow.
Normally, there should be about 5 to 6 inches of space between each seedling. When the seedlings begin to grow, they become overcrowded, and this is where you begin to thin them out. You can use a pair of scissors to thin them by cutting away the excess seedlings that have also grown.
- The sliced out seedling can be eaten. They are edible, and they have a peppery flavor.
2. Daikon needs to be watered 2 to 3 times a week.
To make sure the daikon radishes grow well, you’ll need to water them regularly. Inspect the soil periodically to determine if the soil is moist or not.
- Put your fingers 1 inch into the soil to check if it is moist. If you notice that the soil is dry, then it is advisable you water it immediately, but if it is not, then leave it for another day.
- If you’re planting the daikon mainly because of the microgreens, it is better you wet the soil with a spray bottle of water. Doing this will make sure the plant remains undisturbed.
3. The daikon seedling should be covered with crop covers to guard the leaves.
If you’re worried about insects eating your daikon plants, you can use crop covers to cover the seedlings. Crop covers are mesh covers that are used to enclose the plants. You can get crop covers at garden centers.
- You should make sure the crop cover stays intact, even in the wind. Furthermore, you can place heavy rocks on the mesh cover’s edge to keep it in place.
4. Apply about 2.5 to 5 cm deep layer of hay mulch.
The seedlings of the daikon will die if the cold is too much for them. It is vital to plant the seedlings before the temperature gets too low. When you notice the temperature is too low for the daikon seedlings, it is better to cover them with layers of mulch that’ll shield them from the cold.
- When you notice that the temperature might start to result in freezing, it is better to plant the daikon in a container or pot.
Part 3
Harvesting Daikon
1. Snip off the microgreens when they are over 2 inches in height.
The small leaves that pop out of the floor before daikon starts to form are called the microgreens. A pair of clean scissors should be used to cut off the leaves from 0.5 cm from the soil.
- Microgreens are fantastic and can be eaten raw or cooked. They also go well in salads and can be fried with other fresh vegetables.
2. The daikon leaves should be harvested when they are about 8 inches tall.
When you measure the daikon leaves and notice that it is about 8 inches tall, you harvest them. A tap can be used to take their measurements, and once they’re almost 8 inches tall, you prepare to pull them up.
- Daikon leaves can be consumed raw, cooked, or fried. They go absolutely well in smoothies too.
- Radish becomes too woody and hard if they are left to stay on the ground too long. When you notice this, it is advisable not to eat it.
3. Harvest the leftover radishes before the ground gets too cold.
When you have some daikon that is still growing, and you notice that the temperature is dropping to a freezing point, it is better you harvest the radish. If they stay too long on the cold ground, they will get spoilt.
Conclusion
This article serves as a guide on how you can grow, care for, and harvest your daikon radish. The guide talks in detail about the various steps you should take in order to grow the best radish in the area. It also contains tips to follow in case the weather becomes unfavorable for your daikon.
Thank you so much for your time to read these articles. If you have any questions or something you want to share, kindly leave your comment below, and I’ll be happy the write back to you.

Aidan095
Where we live in Spain Daikon are quite popular. My wife loves them. I do have a plot of land where I grow onions, tomatoes, zucchini, ball peppers and chilies. I think I would like to give these a go, I am sure my wife will be happy. Bookmarking this article.
Thanks
A
Mike
Hello there! Daikon is one of my favorite vegetables to eat. It doesn’t necessarily have much flavor, but when you put some into soups with various meats, it will absorb the flavor. I did not know the leaves were edible, I might try it one of these days! Do the leaves have some flavor or flavorless like lettuce? It also brings me joy to see the daikons popping out of the ground like in one of your pictures you included in this post. It makes me want to start growing some. I currently live in a colder environment where there are rain and snow to be too late for now. Perhaps this October, like you mentioned!
admin
Thank you so much and your excuse for visiting my site. Thank you for your interest to build another house agai
meenaf1
Thank you for sharing about garden ideas. I learned about the maintenance of Daikon. I liked all the tips which you have shared. They are excellent knowledge for all those who would like to learn about Daikon gardening and maintain it.
I also learned about the good time as to when it should be harvested. We could do so when it is about 8 inches tall. I am just wondering which time of the year is good for growing it in my backyard. Me, I have grown a few other vegetables so far but not Daikon.
All the best!
admin
Hello Meena,
Nice to hear from you, and thank you for having your time to visit my site. Thanks to that, you find this informative and make it a guide for your next gardening in your nice place.
Thanks,
Joyce
Nina
Thanks for this guide on how to grow, care for, and harvest daikon radish. I haven’t heard of daikon yet, I have to check if we have a suitable climate for raising this species, but it would be interesting to try. I see in your article that you can eat it raw or cooked, and you add it to different dishes. I assume it is suitable for a variety of sauces and dressings?
I like to try something new every year, so maybe this year I will really try to raise daikon.
Thanks for the presentation and all the tips regarding growth, care, and harvesting.
I wish you much joy in gardening,
Nina
admin
Hi, Nina!
Thank you so much for your time reading my article about how to grow Daikon. I appreciate you very much. Best wishes to you, my friend.
Thanks,
Joyce